Sunday, April 24, 2011
Happy Easter
I hope everybody had a very happy Easter today. We had afternoon tea and an Easter Egg Hunt with very dear friends!!! Makes the day even sweeter!
Friday, April 22, 2011
Yummy Carrots!!
I saw a "How To" for these carrots in Martha Stewart Living Magazine. I thought they looked so cute so I decided to make some for Easter. Now these are not ordinary carrots mind you. They are chocolate carrots. Yum yummy yum!!! You will need a roll of orange crepe paper and a roll of green crepe paper for the tops. Also you need a candy that will work to be wrapped inside the carrot. I chose Hershey's chocolate bunnies because they are long and thin and won't distort the carrot shape too much. Cut some green crepe paper in the shape of a topper and put aside. Then start on the thin side of the carrot and just roll your crepe paper adding candy as you go. Wind the crepe paper back and forth until your carrot is firm and has a pleasing shape. Then wind your paper to the top of the carrot, lay the topper down and wind it into the carrot shape with the cut ends protruding from the end of the carrot. Use a little glue stick to secure the end of the orange crepe paper to the carrot.
I am having company on Easter Sunday, so I made a carrot for each person who will be at my home. I laid some easter grass into a wooden bowl and placed the carrots on top! Aren't they cute?
I am having company on Easter Sunday, so I made a carrot for each person who will be at my home. I laid some easter grass into a wooden bowl and placed the carrots on top! Aren't they cute?
Thursday, April 21, 2011
Playing with Yarn
In my travels around blogland, I have seen many people making Japanese Flowers. They are so colorful and cheerful. Thanks to Elizabeth for her tutorial. I whipped these up in no time at all. Now I am thinking what to do with them. Another blanket? Maybe!! It would be lovely for spring don't you think!
My fabric has been neglected for a few days. Hmmm, Ramblings of a Quilter? I should have put Ramblings of a Quilter / knitter / crocheter!!! In my defense, I have sewn a few of my hexagons together. I will show you pictures of the progress soon.
Hope you are having a glorious day.
My fabric has been neglected for a few days. Hmmm, Ramblings of a Quilter? I should have put Ramblings of a Quilter / knitter / crocheter!!! In my defense, I have sewn a few of my hexagons together. I will show you pictures of the progress soon.
Hope you are having a glorious day.
Wednesday, April 20, 2011
I Proudly Present a Finish - A Big Finish!!!
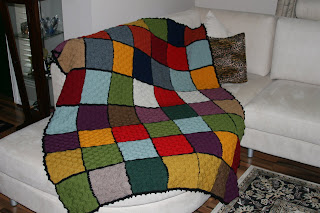
My knitted afghan which I started in late December 2010 is finished!!! I love it when I get a big project completed. It is big - my helper could not stay the course without falling asleep as you can see!!
I used Lion Brand Wool-Ease worsted weight yarn. I think it is going to be warm. It is also very soft which will be wonderful for an afternoon nap!!! The black border on each square makes the colors pop and also makes a neat border around the basket stitch knitted squares. The borders are crocheted together and then the blocks are hand stitched together.
I am doing the dance of joy. Now I should go and round up another large UFO and get busy!
Thank you for stopping by and have a terrific day.
Friday, April 15, 2011
Painting some Easter Eggs
I've been having some fun painting easter eggs for display. I love the wooden eggs with a flat bottom so that you can stand them up on their own.
After painting them, I give them a coat of varnish to finish them off!
I am still thinking about what to do on these large eggs! Hmmm, shall I paint something onto them, decoupage? I will wait for inspiration!!!
Thanks for stopping by and have a great weekend.
After painting them, I give them a coat of varnish to finish them off!
I am still thinking about what to do on these large eggs! Hmmm, shall I paint something onto them, decoupage? I will wait for inspiration!!!
Thanks for stopping by and have a great weekend.
Tuesday, April 12, 2011
Stenciling on Fabric
Have you tried stenciling on fabric? Oh, it is so much fun. I had a bunch of reproduction fabrics that I wanted to make something with. Looking at them made me think of Spring. I really love bunnies and decided an easter quilt would be wonderful. I poured through my stenciling books and found this cute couple!!!
It is really easy to do. You can use craft paints. You will need to buy a bottle of Textile Medium (found with the craft paints) and mix your colors and textile medium according to the manufacturers directions. Pre-wash and press your fabric. Place the fabric square over a piece of cardboard so the paint does not bleed onto your work surface. Commence stenciling. Don't overload your brush and use a pouncing action. When you are done, lift your stencil carefully and in an upward motion so that you don't smear the edges.
I really like how this quilt turned out. Give it a try!! It really is easier than you think.
Have a wonderful day and thank you for stopping by.
Friday, April 8, 2011
English Paper Piecing
A few weeks ago I was privileged to attend a talk by Betsy Chutchian (Book - Gone to Texas) at my local quilt store. Her family had moved to Texas in the 1800's and a member of the family had kept a journal. In the journal she mentioned the quilts she was making. Betsy turned all these memories into real quilts and she had them with her to show us. What an interesting morning. Such beautiful quilts too. One quilt which really spoke to me was a hexagon quilt (grandmothers flower garden). I decided I simply had to make one. I decided to use the English Paper Piecing Method. I love it because it is so accurate. I draw my templates onto freezer paper which I then iron onto the back of the fabric. While basting, the template paper does not move at all which is a help in getting your individual hexagons to be the same size.
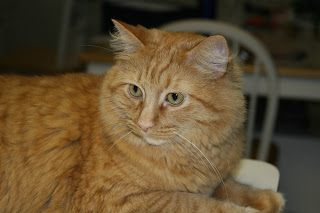
My sweet cat had to come and supervise what I was doing, and since he looked so sweet I had to put a picture of him onto the blog too.
These are the "flowers that I have done so far. Fat quarters work really well for this project. If you choose two fat quarters, cut 19 hexagons out of each one, you can make two flowers, one with the colors flipped!
The thing which really made this quilt spectacular was the fact that the flowers are bordered with black hexagons. Betsy quilted within the border of each hexagon using embroidery floss. It was such a beautiful quilt. I hope mine will be too!
Wishing you a wonderful day, and thanks for stopping by!
PS The one thing which Betsy found frustrating in trying to figure out what the quilts looked like from the journal was the lack of information about them. She suggested that if we keep a journal and write about our quilts that we be very specific about what we are working on. So, remember the details!
Sunday, April 3, 2011
A Visit to the Arboretum
Yesterday was the last full day of having our sons home for Spring Break. We decided to pack a picnic and visit the Dallas Arboretum. The weather was wonderful - in the 80's and quiet humid. We had missed the tulips at the height of their beauty, but some were still left and the flowers were spectacular!! We had so much fun!!! Here are a few photo's of the flowers for you to enjoy.
Japanese Snowball.
Foxglove.
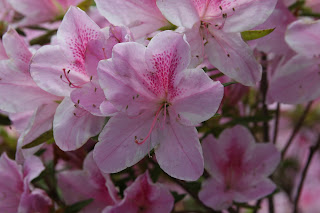
Azaleas. Oh my gosh the Azaleas are so very beautiful. They were so big and in full bloom. My son did tell me that they are even more spectacular in Charleston (that is where he goes to college).
The colors are just so vivid. I love the lesson in color that nature provides. My philosophy is if it is present in nature, it will look wonderful in a quilt!!
I wish you a peaceful Sunday before the start of a new week.
Subscribe to:
Comments (Atom)


