Wednesday, June 10, 2015

Mandalas!

I occasionally purchase Mollie Makes Magazine because they always have such cute patterns.  Invariably there is something that I want to make from the patterns in the magazine.  Particularly the crocheting patterns.  This latest issue is no different.  There is a pattern to make a Mandala in three different sizes.   I tore the cover when I pulled off the free craft envelope.  It was sticky, sticky glue!
 This is the pattern page with the three varying sized Mandalas.  I went and got my stash of Stylecraft DK and started crocheting.

I was very happy with how it turned out.  It is so much fun to pick colors and play with color combinations.  I sat looking at it and thought what a nice trivet it would make.  Of course it was not thick enough.  So the only thing to do is to make another identical one.

Here I am working on Mandala number two!

Ta-da!  Two complete and now I get to crochet them together.  I used a double crochet with a picot every fourth stitch.
 

Here is the finished article with both sides being identical and looks so cool with my teapot perched on it.

Another view!

What?  Another Mandala?  Yup, this one is a pot holder.  Also double so those hot pot lids and handles don't burn your hands.  This was such a fun project to work on and two finishes in a day - that  is awesome.

Wednesday, June 3, 2015

Some Crocheting and a Patriotic Flag Table Runner!

I have been working away on several projects lately getting closer and closer to some big finishes.  I really felt like finishing something and finishing it quickly.  I found a darling pattern for a doily on Pinterest and thought it would be a wonderful quick finish project.    This one is for my bathroom, which is a green and apricot color.


I liked it so much that I decided to make another one in Patriotic colors.  I love this one too!  I still felt like finishing something small and cute.


Yesterday Barb, from Fun with Barb, posted this cute table runner on her blog.  It spoke to me!!!  I have the tumbler template and you all know I have fabric.  So this morning I made this cutie.  Barb I hope you don't mind me so shamelessly copying your cute table runner.


 Our neighbor went away on vacation for a couple of weeks and my son looked after the animals on his mini farm.  I went along to play with the animals and get my goat fix.  Such sweet things.  Really loving the country.

Wednesday, May 6, 2015

A Bit of This and That!

We have been in our new home for a month now and are settling in very well.  I am loving living in the country.  We are unpacked and making the house a home.  We arrived in New Hampshire and it was winter.  So much has changed in a month!  Spring has sprung and the first sign of spring are these lovely daffodils.  So vibrant and yellow!
 I have been yearning to get back into the sewing room and I have managed a few small things.  This is a pattern from the Moda Candy books.  I just felt like making a small quilt.  The top is done and is waiting for me to quilt it.
I have done a few more blocks on my leader ender project.  Each block has 100 1 inch blocks in it.  I'm onto row two and I am excited to see how colorful it is.
 Some tulips from the garden!  Such a pretty color.
 A new centerpiece for the new kitchen table.  I love this pattern and have made five or six different seasonal centerpieces using this pattern which appeared a couple of years ago in a "Quilts and More" magazine.   The old kitchen table is in my sewing room and I am loving the huge workspace.  Hopefully I am back in the swing of things and will be blogging regularly again.  Take care and thanks for stopping by.

Saturday, February 28, 2015

A Cute Crocheted Square!

I have mentioned that I will be moving in March.  We are hauling things out of closets and attics and sorting like crazy!  Thinning out ones possessions is a good thing.  I came across a bag of yarn that I have probably had since before I was married.  I have been married for 27 years!  I looked at all the colors and knew what I could do with the yarn.  So in-between sorting and cleaning out I have also managed to start a new project.  The little square is easy to crochet and it is certainly fun to make.  I am including a tutorial here.  Also seen on Dutch Sisters blog.  Begin by chain stitching 6 stitches.

 Close the circle with a slip stitch.
 Chain 3 (will count as 1st double crochet), double crochet 15 stitches into the circle.  16 total.
 Close the circle with a slip stitch.  Chain 4 (4th chain will count as a ch1 between the double crochet stitches).  Make 1 double crochet, ch1 into each stitch below.  16 total.
 Close the circle with a slip stitch.
 Slip stitch into the first chain space and make 3 double crochet stitches.  Make 3 double crochet stitches in all the following chain spaces.
 Make a slip stich to close the circle.  End of your work.
 In a contrasting color make a slip stitch onto your hook.
 Join to your completed circle in any space between the groups of 3 double crochet stitches.
 Chain 3 and slip stitch between a 3 dc group.  Do this 3 times in total.
 To make your first corner chain 5 and slip stitch into the next space between 3 dc groups below.
 3 chain, slip stitch into next space 3 times and then 5 chain into next space.  Repeat twice more to finish your row.
Slip stitch into the 3 chain space and make 3 double crochets (3 chain and 2 dc in first group).  Repeat this 3 times.  You should have a 5 chain space next.
 To make the corner 5 double crochet, 2 chain, 5 double crochet.
 Then 3 groups of 3 double crochet into the next 3 chain spaces.  Repeat corner and work the next two sides.
 I join as you go, so that I don't need to do a bunch of sewing at the end.  There are many good You Tube videos on the join as you go method.
 This is such a cool pattern and it is so colorful.  I hope you give it a try.

Wednesday, February 18, 2015

Hexagon Wall Hanging!

We will be moving next month!  We are leaving Texas for New Hampshire.  I am beyond excited by this new adventure.  We have bought a new home and I can't wait to decorate it.  We have been in our current home for 15 years.  The kids have finished school and are either graduated or in college.  So... my husband and I thought it was just the right time for another adventure.
With that being said, of course I need to make a quilt for the new place.  I had started these rosettes a couple of years ago, loved them, but did not know what to do with them exactly.  I just know my dining room in the new house would benefit by a wall hanging of these yummy rosettes.  So I decided on my background fabric - Moda Cherry.  So pretty and full of energy.   I have been making more rosettes!
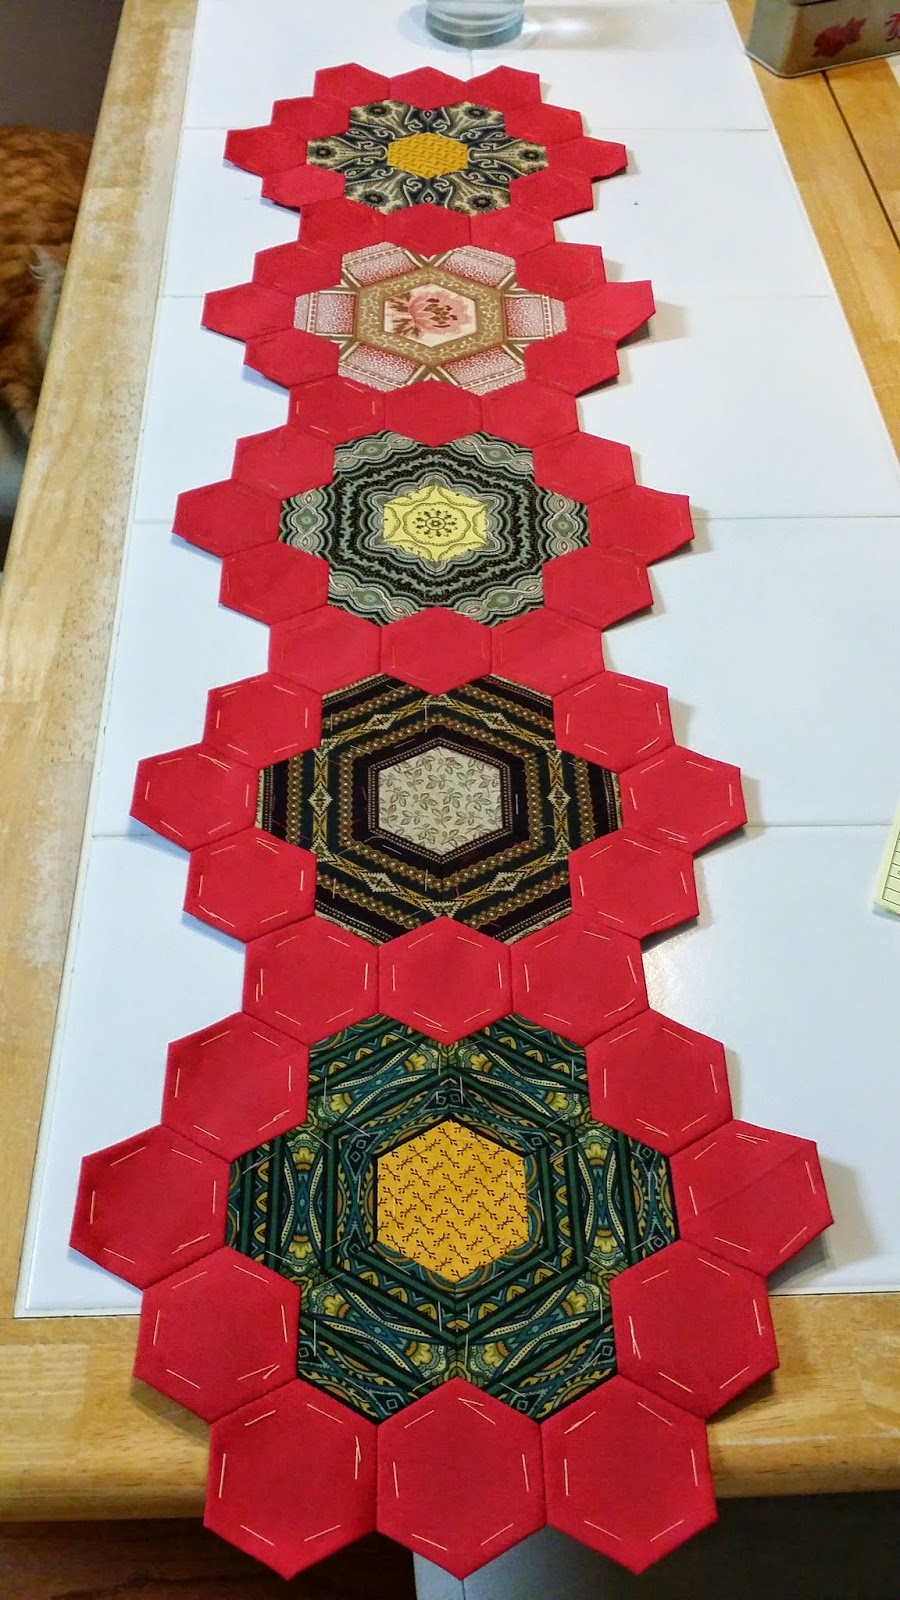
 Striped fabric is the theme for this quilt.  I love how the stripes give you secondary hexagon shapes within the rosette.
A few of them are not from striped fabric, but also fussy cut.
Here is the beginning of the wall hanging.  I am not sure how wide to make it.  So far I have five in a row.  I may add a sixth one.  I am loving making these again.  I will continue to show the progress on this project.  Thank you for stopping by for a visit.

Friday, February 13, 2015

Pillowcases!

I had bought some cute fabric with birch tree trunks on them.  I thought they would make awesome pillowcases for my son who is a nature boy.  I found some wood grain fabric too.  I used a grunge fabric for the small contrasting strip.
 I did French Seams because I hate raw edges!  They turned out very well.  I love them, and he loves them.

Wednesday, February 11, 2015

Cushion Covers for my Daughters Bed!

A couple of years ago we bought an awesome duvet cover set for my daughters bed.  The print has big doilies on it in purples and pinks.
I was inspired to make cushion covers for her continental pillows (26" x 26") to mimic the cover.  I went through my stash of doilies made over the years and picked out a few that I thought would work and got cracking on the project.  I picked a Moda Solid called Eggplant and quilted it in a crosshatch style.  Small 1/2" blocks.  I used my walking foot as the guide.  The small crosshatch leaves one with a stiffer finish to the fabric and it feels gorgeous to run your hands over it.
 Then I placed the doilies onto the front and appliquéd them down.  Next step was to assemble the cushion.
 I really love how they compliment the cover.  I hope she will love them when she gets back for spring break!